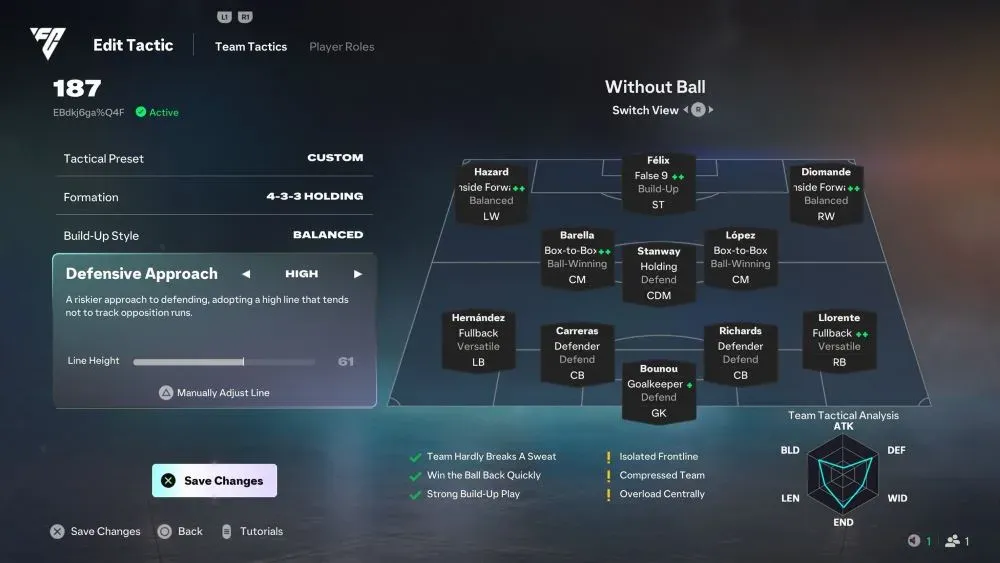
Your 4-3-3 keeps conceding to one through ball. Your striker drops deep, the wingers cut inside, the midfield pushes up — and suddenly the opponent has a straight lane behind your back four. That is the trade-off built into this 4-3-3 Holding FC 27 False 9 code (EBdkj6ga%Q4F): a Balanced team Build-Up Style, a High defensive approach with Line Height set to 61, two Box-to-Box Ball-Winning midfielders, and a striker whose primary job is to drop into midfield, link the attack, and create opportunities for the Inside Forwards to run beyond him. The setup is strong when the pieces connect, and fragile when they do not. The player names and roles below follow the screenshot; individual card versions may differ.
How the False 9 Creates Space for the Inside Forwards
The striker is set to False 9 · Build-Up, not Attack. With a Build-Up focus, the False 9 drops back from the opposition’s defensive line to act as a playmaker and help initiate attacks. His movement can create a gap between the opposition’s midfield and defensive lines. In the screenshot squad, João Félix plays this role, with Hazard and Diomande as the two Inside Forward · Balanced wingers. They can use that space to receive passes or make diagonal runs, depending on how the opponent marks the striker and protects the channel.
Against a deep block, if the opponent refuses to follow, the False 9 drops into traffic and the wingers face a settled back line. Read whether the opponent will follow the striker.
Why Two Ball-Winning Box-to-Box CMs Are the Engine — and the Risk
Both central midfielders are Box-to-Box · Ball-Winning. Compared with a Balanced focus, Ball-Winning places greater emphasis on recovering possession. That gives the pair a more aggressive ball-recovery role, which suits a high line. In the screenshot, Barella and López fill these roles, with Stanway behind them as Holding · Defend. Both cover significant ground, so high stamina matters with a High approach. Stanway protects the space in front of the center backs when both B2B players are drawn forward or across. If opponents bypass the press with early long balls, consider switching one CM to a more defensive role to protect the space in front of your back four.
Fullbacks, Center Backs and the High Line
With Hazard and Diomande cutting inside, the fullbacks must provide width. Hernández and Llorente use Fullback · Versatile, supporting the attack while retaining defensive duties. When a winger moves inside, the fullback offers a passing option near the touchline. Do not send both forward carelessly: with Line Height 61, losing possession while both are advanced leaves the center backs exposed. Carreras and Richards need pace to recover against through balls, and Bounou stays on Goalkeeper · Defend.
Line Height 61 Works Only Because of the Midfield
A Line Height of 61 is the lowest setting in the High defensive range. The game notes this approach tends not to track runs, so on its own it invites counterattacks. What makes 61 defensible here is the double Ball-Winning midfield: it is designed to reduce the time opponents have to organize a counterattack. By contesting possession earlier, the two CMs can help protect the space in front of the defensive line. Treat 61 as a coordinated choice: if midfield aggression drops, the same line height is far more exposed.
The In-Game Analysis Labels, Translated Into Match Situations
The tactic screen flags three strengths — Team Hardly Breaks A Sweat, Win the Ball Back Quickly, Strong Build-Up Play — and three weaknesses: Isolated Frontline, Compressed Team, Overload Centrally.
Win the Ball Back Quickly
Your B2B midfielders can intercept square passes near the halfway line, with the False 9 dropping in to recycle possession immediately.
Isolated Frontline
Against a 5-back or a low 4-4-2 block, the False 9 drops deep, the wingers move inside, and the team may lack a consistent central runner to threaten the last line.
Overload Centrally
With both wingers inside, the False 9 dropping and the CMs arriving, the attacking third becomes crowded. If two passes cannot break the central line, switch to the free fullback. When both wingers cut inside, the ball-side fullback must provide width — otherwise the compressed shape turns into a turnover.
Match Adjustments That Keep the Tactic Usable
If opponents keep breaking through the middle, switch one CM to a more defensive role, if available for that position. This sacrifices mobility but gives your back four more protection. If fast runs behind the fullbacks are the problem, switch to a deeper backup tactic instead of fighting the same line height for ninety minutes. Center backs need enough pace to recover against through balls; both Box-to-Box midfielders need strong stamina and defensive attributes. The False 9 needs passing, vision and composure more than finishing, because his first job is to connect, not shoot.

Final Verdict
This is not a plug-and-play meta tactic. It is a possession-and-pressing setup built around the False 9, aggressive midfield recovery, and a high defensive line. It works best when the striker creates space, the wingers attack it, and the two Box-to-Box midfielders keep opponents under pressure. But the high line leaves little room for mistakes, especially against quick counterattacks. Import EBdkj6ga%Q4F, test it in Squad Battles first, then adjust your midfield roles or switch to a deeper backup tactic before taking it into Rivals.